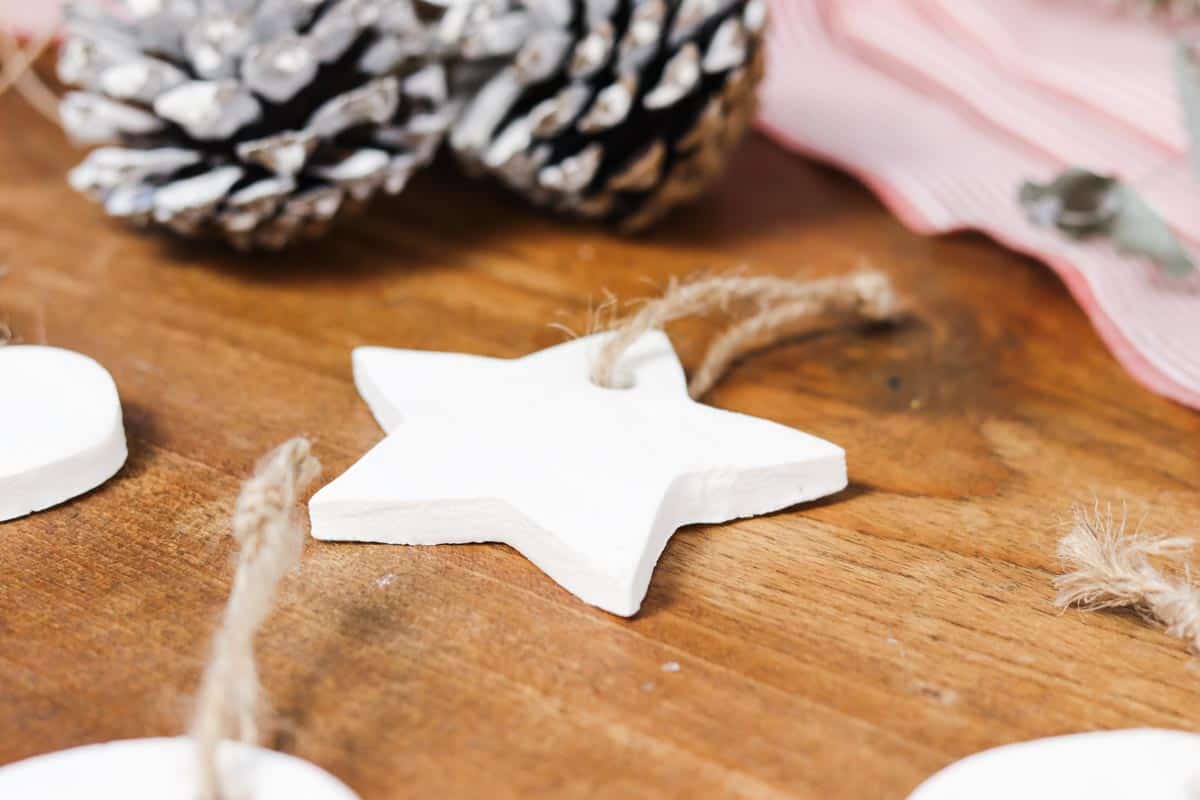
In this blog I'm sharing how to make snow white baking soda Christmas ornament dough with just four everyday ingredients. Better then your average salt dough, but just as easy, these baking soda Christmas ornaments cost pennies to make, are non-toxic and kind to the earth, and can be whipped up in a morning of festive fun.

Jump to:
In this blog I'm sharing how to make baking soda Christmas ornament dough, which I personally think is much better than traditional salt dough which tends to be off-white in colour and can puff up in the oven.
I love the minimalist, handmade look of clay and ceramic ornaments with their snowy whiteness and matte finish, but I am not so keen on store-bought air dry clay. It's expensive (about $20 per kilo) and some varieties contain micro plastics.
This baking soda Christmas ornament dough holds it shape very well, so it's perfect for stamping or embossing, and most importantly is a beautiful crisp white.
Baking soda is such a versatile ingredient. I also use baking soda in cooking and to clean without harsh chemicals.

Why I love it
There are so many reasons to love baking soda Christmas ornaments! They're:
- affordable
- tactile and fun to make
- non-toxic
- easy for kids to do
- environmentally friendly
- and oh so pretty!
How to make baking soda Christmas ornament dough
This recipe makes approximately 12 medium sized ornaments.
Equipment you may need
- Medium saucepan
- Whisk
- Spatula
- Dinner plate
- Baking paper
- Rolling pin
- Christmas shaped cookie cutters
- Drinking straw, preferably stainless steel
- Stamps or lace for embossing (optional)
- Two baking trays
- Ribbon or twine
Ingredients
- 1 cup baking soda (sodium bicarbonate)
- ½ cup corn starch (corn flour)
- ¾ cup water
- Extra corn starch
Method
- Sift together the baking soda and corn starch into the saucepan.
- Gradually add the water, whisking well to combine.
- Place the saucepan over medium heat and bring the mixture to a simmer, whisking continuously.
- Cook until the mixture thickens into a paste.
- Remove the saucepan from the heat and transfer the paste mixture to the dinner plate using a spatula. Squash it down a little and allow it to cool.
- Meanwhile prepare a work surface by dusting with corn starch, ready for kneading the dough mixture.
- After about 5 minutes, when the dough mixture is cool enough to touch, lightly kneed it, adding a extra corn starch until you reach a soft consistency that's not sticky.
- Next, lay a sheet of baking paper on the work surface and lightly dust with corn starch.
- Place the dough on the baking paper and, using a rolling pin, roll out the dough to approximately ½ centimetre thick (thicker dough will take longer to dry, and thinner dough will be prone to breakage, so ½ centimetre is the sweet spot).
- Cut out the ornaments using a cookie cutter and use the drinking straw to punch a hole at the top for hanging. You can also make a more organic shape by taking a small amount of dough and shaping it into a ball before rolling it flat to ½ centimetre thick.
- If stamping or embossing the ornaments, do that now.
- Using a toothpick, gather up the excess dough and kneed again. I like to do it this way so I don't have to try and move the cut out shapes and risk distorting or stretching them.
- Repeat the process until all your dough is cut and shaped.
- Carefully transfer the baking paper and ornaments onto baking trays. Using a soft brush, dust off any extra cornstarch and use your finger to smooth and rough spots or edges.
- Bake for 30 minutes at 70 degrees celsius, or until just firm.
- Allow the ornaments to cool and then flip them over. Allow to air dry for a further one-two days, or until set hard.
- Add ribbon or twine and enjoy.

How to make baking soda Christmas ornaments
Learn how to make snow white baking soda Christmas ornament dough with just four everyday ingredients. Better then your average salt dough, but just as easy, these baking soda Christmas ornaments cost pennies to make, are non-toxic and kind to the earth, and can be whipped up in a morning of festive fun.
Materials
- 1 cup baking soda (sodium bicarbonate)
- ½ cup cornstarch (corn flour)
- ¾ cup water
- Extra cornstarch
Tools
- Medium saucepan
- Whisk
- Spatula
- Dinner plate
- Baking paper
- Rolling pin
- Christmas shaped cookie cutters
- Drinking straw, preferable stainless steel
- Stamps or lace for embossing (optional)
- Two baking trays
- Ribbon or twine
Instructions
- Sift together the baking soda and cornstarch into the saucepan.
- Gradually add the water, whisking well to combine.
- Place the saucepan over medium heat and bring the mixture to a simmer, whisking continuously.
- Cook until the mixture thickens into a paste.
- Remove the saucepan from the heat and transfer the paste mixture to the dinner plate using a spatula. Squash it down a little and allow it to cool.
- Meanwhile prepare a work surface by dusting with cornstarch, ready for kneading the dough mixture.
- After about 20-30 minutes, when the dough mixture is cool enough to touch, lightly kneed it, adding a little extra cornflour until you reach a soft consistency that's not sticky.
- Next, lay a sheet of baking paper on the work surface and lightly dust with cornstarch.
- Place the dough on the baking paper and, using a rolling pin, roll out the dough to approximately ½ centimetre thick (thicker dough will take longer to dry, and thinner dough will be prone to breakage, so ½ centimetre is the sweet spot).
- Cut out the ornaments using a cookie cutter and use the drinking straw to punch a hole at the top for hanging. You can also make a more organic shape by taking a small amount of dough and shaping it into a ball before rolling it flat to ½ centimetre thick.
- If stamping or embossing the ornaments, do that now.
- Using a toothpick, gather up the excess dough and kneed again. I like to do it this way so I don't have to try and move the cut out shapes and risk distorting or stretching them.
- Repeat the process until all your dough is cut and shaped.
- Carefully transfer the baking paper and ornaments onto baking trays. Using a soft brush, dust off any extra cornstarch and use your finger to smooth and rough spots or edges.
- Bake for 30 minutes at 70 degrees celsius, or until just firm.
- Allow the ornaments to cool and then flip them over. Allow to air dry for a further one-two days, or until set hard.
- Add ribbon or twine and enjoy.
What can you do with baking soda Christmas ornaments?
- Hang them on your tree
- Give them as gifts
- Use them as gift tags
- Create a garland
- Use them to embellish a wreath
- Create personalised place settings
How to dry baking soda dough Christmas ornaments
The easiest way to dry dough ornaments is to simply leave them to air dry for a couple of days, turning them over halfway through.
If you want to speed up the process, you can bake them a very slow oven (70 degrees celsius) until dry; approx. 60 minutes. Oven drying the ornaments does increase the risk of browning and cracking so keep keep a close eye on them and keep the temperature low.
I like to give the ornaments and initial brief drying period in the oven for about 60 minutes and then leave them to air dry for the next couple of days.
How to decorate baking soda dough Christmas ornaments
One the ornaments are dry you can decorate them any way you want trying adding colour with paint or markers, or adding embellishments like wooden beads or bells.
How to store baking soda dough Christmas ornaments
Store the ornaments in a sturdy airtight container between layers of soft paper towel. Keep them dry and safe, and they'll stay pretty for years to come.


Rox
Great idea!
Emily
Thanks Roxanne!